

Post by delboy on Jan 12, 2007 17:23:14 GMT -5
Bought the bus in Late july 05,
Bought through Exeter bug center, who aquired it from a exeter uni lad, who had thought it would be a great idea to re paint the top with white sandtex exterior house paint.
Which has turned out giveing the bus a .....umm.....
.......well textured finish.
Originally being a delux microbus it had several row's of seating.
Not being great for camping,
someone prior to me, removed the seats and put in a home made interior.
Which was a little unusal and falling apart.
On getting the bus for a bargin price I removed the delux trim as it wasn't your normal belt line trim, It was a funny low line trim (Which i didnt like)
And stripped the interior,
replacing it with a very minimal interior that includes a rock & roll bed and a top locker, put down some laminate flooring and that is how it has stayed until such time that i decide to change it.
My son Bailey has named the bus BUDDY which is DUB backwards (BUD) plus a bit added on to make a name...
Due to the rain and any other bit of water leaking in through the holes where the trim was removed i filled the holes to make it water tight
then sanded it down, giving it a rough ratty look...
After doing a bit of camping and travelling in it, We had to have an engine change to to unforseen reason's (BEN..... )
I then set to on fitting 16" merc alloys (Dont try it, tends to become more work that you first think! :evil: ) to give a bit of a better look & improve the handeling.
After looking like the club embarrasment for a couple of months,
we decided to just give the bus a coat of High build primer,
which can be sanded to a smooth finish when it comes to giving the bus its final coat of paint.
(which will be done in years to come)
We have also fitted recaro front seats, Mountney steering wheel, new stero system, EMPI trigger shifter, 3 3/4" rev counter, 2 bow roof rack monza 4 tip exhaust, (which is wrapped) New number plates Clear indicator lenses front & back & a few other little bits and pieces to improve on the over all effect & look.
I am going to lower the bus in the very near future to get it sitting a little better, as i feel that it sitting little high at the front, making it look weird.
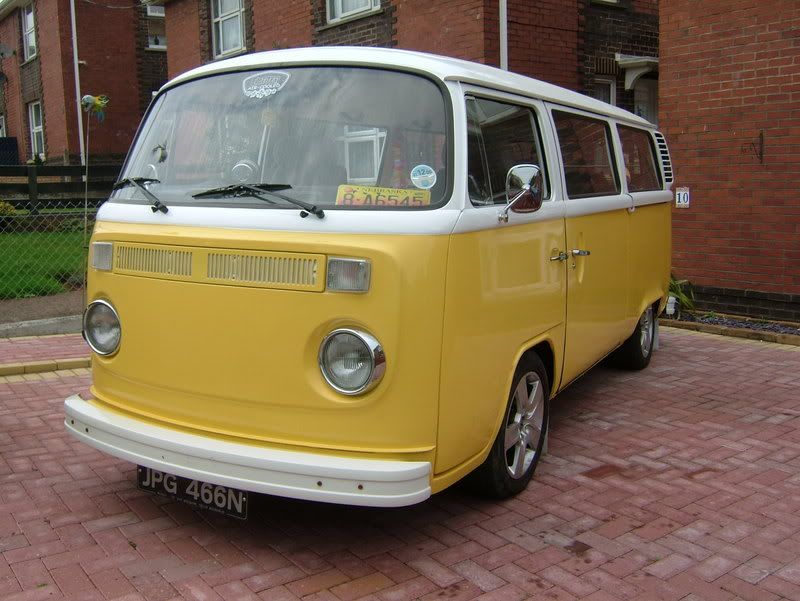
Our idea is to paint it in a colour called Kashmeire yellow, which is a very light, pastel shade of yellow that is used on old Vauxhalls,
And it was the very colour that our '72 bug was in.
We are going for a Kashmeire yellow lower section, white center section and Kashmeire yellow roof.
We are in desperate need to replace:
1) Both the front door sills
2) Both inner sills
3) Both exterior sills
4) Both front doors
5) Off side rear quater
As Buddy is an ongoing, working project, it will never be finished.
Ther will always be something left to do.
When / If i do ever finsh him it will probably be time to stat another project.....
The few pictues that are below, are just to show the difference to how it was, to how it is now.


The next stage:


Well this was a bit more progress

Got these for a nice after touch.
Been sanding again but now getting ready for primer very soon!!!!


Well, ive been tackleing the task of cutting and welding rusty holes.
I myself did cut out all the bits and cut the replaement patches but just to be sufe i got dean at A1 Veedubz (Where it is all being done) to do the welding in the important areas and had a go on the smaller areas like in front of the drivers step due to the fact he flat panels are really easy to distort with the welder :?
Getting there now
Was really funny to see the look on NAM's face and Ralph & Pips when they had seen what a state the bus is in..... :lol:
But hey, at least im getting my hands dirty & doing it!
Just hope i can remember where all the nuts and bolts come from :oops:


Heres a few more piccys of further disaster!


Ive been spending a load of time on the camper but hope you can see the results of all the hard work done!
Got to get a move on as im running out of funds and still paying rent to A1 V Dubz!


Even Ria has a smile on her face now the end is near!!
Well here is the painting pictures, its been along time of sanding, priming, sanding, priming,sanding blah blah blah....
But at last it came to this....


Thats all the white paint on.....
Part 2 of paint... The colour......


Then start putting it back together again :?

Been busy again put in the newly powder coated dash board and all the little bits odds ad sodsin it and sorted all the electrics and got the side door mounted and rear end put together!


also got new wheels thanks to gav @ SWS
This comming week engine is being take out, heads tightened as they are blowing, fuel tank sender will be replaced for a working one and engine bay painted with black stone chip!!!!
Next weekend shoud be putting oin windows and getting it on the road!!!!
Now im getting really near to going up the road in a resto'd camper!!
Just need to mop the near side of the van, then collect the last of the bits i need from South west splitz (drivers door and side trims).
As I was still waiting for a delivery of window rubbers, this weekend so thought i may as well start to do the interior..
Wasnt gonna go with the unit's but thoght it was a little more pratical to have some storage and it has the added attraction of not having to empty the van after every camping trip :!:
I CANT WAIT TO GET CAMPING!!!!!!!!!!!!!!!!!


Bailey helped

Ria tested :lol:
Just need to do a little bit of finnishing, then im done....
Well here is the final set of piccys needed i think,
After many hours and blood, sweat & tears i can reveal
THE CAMPER IS FINISHED!!!!! (well until i lower it ect )
)
Just to make sure it was up to standard we took it for a camping session...


Since finishing the bus we have been using it loads,
Its been used as wedding transport:

Used on a hunnymoon holiday:

even been down to Lands end:

And also used as EAC Club DJ station!!

Its a great bus and we love it to the max!
Also added a rear bumper to it and a new MONDO exhaust to improve performance :twisted:
Next thing is:
Slamming it to the floor, Got the lowering adjusters already....
Twin Carb conversion, Got them too
Well, it has began...
Went about lowering this week and was sucsessfull


Now got the bus sitting about 6 inches lower than it was at standard hight and now rides at about 3 inches off the road :twisted:
Last few piccys of the new ride height!!! :twisted: :twisted:
standard height!

New ridin' height :evil:


Since this has all ben done, i even got a little mension in Volksworld in Feb 2007 issue on page 66


Bought through Exeter bug center, who aquired it from a exeter uni lad, who had thought it would be a great idea to re paint the top with white sandtex exterior house paint.
Which has turned out giveing the bus a .....umm.....
.......well textured finish.
Originally being a delux microbus it had several row's of seating.
Not being great for camping,
someone prior to me, removed the seats and put in a home made interior.
Which was a little unusal and falling apart.
On getting the bus for a bargin price I removed the delux trim as it wasn't your normal belt line trim, It was a funny low line trim (Which i didnt like)
And stripped the interior,
replacing it with a very minimal interior that includes a rock & roll bed and a top locker, put down some laminate flooring and that is how it has stayed until such time that i decide to change it.
My son Bailey has named the bus BUDDY which is DUB backwards (BUD) plus a bit added on to make a name...
Due to the rain and any other bit of water leaking in through the holes where the trim was removed i filled the holes to make it water tight
then sanded it down, giving it a rough ratty look...
After doing a bit of camping and travelling in it, We had to have an engine change to to unforseen reason's (BEN..... )
I then set to on fitting 16" merc alloys (Dont try it, tends to become more work that you first think! :evil: ) to give a bit of a better look & improve the handeling.
After looking like the club embarrasment for a couple of months,
we decided to just give the bus a coat of High build primer,
which can be sanded to a smooth finish when it comes to giving the bus its final coat of paint.
(which will be done in years to come)
We have also fitted recaro front seats, Mountney steering wheel, new stero system, EMPI trigger shifter, 3 3/4" rev counter, 2 bow roof rack monza 4 tip exhaust, (which is wrapped) New number plates Clear indicator lenses front & back & a few other little bits and pieces to improve on the over all effect & look.
I am going to lower the bus in the very near future to get it sitting a little better, as i feel that it sitting little high at the front, making it look weird.
Our idea is to paint it in a colour called Kashmeire yellow, which is a very light, pastel shade of yellow that is used on old Vauxhalls,
And it was the very colour that our '72 bug was in.
We are going for a Kashmeire yellow lower section, white center section and Kashmeire yellow roof.
We are in desperate need to replace:
1) Both the front door sills
2) Both inner sills
3) Both exterior sills
4) Both front doors
5) Off side rear quater
As Buddy is an ongoing, working project, it will never be finished.
Ther will always be something left to do.
When / If i do ever finsh him it will probably be time to stat another project.....
The few pictues that are below, are just to show the difference to how it was, to how it is now.
The next stage:
Well this was a bit more progress
Got these for a nice after touch.
Been sanding again but now getting ready for primer very soon!!!!
Well, ive been tackleing the task of cutting and welding rusty holes.
I myself did cut out all the bits and cut the replaement patches but just to be sufe i got dean at A1 Veedubz (Where it is all being done) to do the welding in the important areas and had a go on the smaller areas like in front of the drivers step due to the fact he flat panels are really easy to distort with the welder :?
Getting there now

Was really funny to see the look on NAM's face and Ralph & Pips when they had seen what a state the bus is in..... :lol:
But hey, at least im getting my hands dirty & doing it!
Just hope i can remember where all the nuts and bolts come from :oops:
Heres a few more piccys of further disaster!
Ive been spending a load of time on the camper but hope you can see the results of all the hard work done!
Got to get a move on as im running out of funds and still paying rent to A1 V Dubz!
Even Ria has a smile on her face now the end is near!!
Well here is the painting pictures, its been along time of sanding, priming, sanding, priming,sanding blah blah blah....
But at last it came to this....
Thats all the white paint on.....
Part 2 of paint... The colour......
Then start putting it back together again :?
Been busy again put in the newly powder coated dash board and all the little bits odds ad sodsin it and sorted all the electrics and got the side door mounted and rear end put together!
also got new wheels thanks to gav @ SWS
This comming week engine is being take out, heads tightened as they are blowing, fuel tank sender will be replaced for a working one and engine bay painted with black stone chip!!!!
Next weekend shoud be putting oin windows and getting it on the road!!!!
Now im getting really near to going up the road in a resto'd camper!!
Just need to mop the near side of the van, then collect the last of the bits i need from South west splitz (drivers door and side trims).
As I was still waiting for a delivery of window rubbers, this weekend so thought i may as well start to do the interior..
Wasnt gonna go with the unit's but thoght it was a little more pratical to have some storage and it has the added attraction of not having to empty the van after every camping trip :!:
I CANT WAIT TO GET CAMPING!!!!!!!!!!!!!!!!!
Bailey helped
Ria tested :lol:
Just need to do a little bit of finnishing, then im done....
Well here is the final set of piccys needed i think,
After many hours and blood, sweat & tears i can reveal
THE CAMPER IS FINISHED!!!!! (well until i lower it ect
 )
)Just to make sure it was up to standard we took it for a camping session...
Since finishing the bus we have been using it loads,
Its been used as wedding transport:
Used on a hunnymoon holiday:
even been down to Lands end:
And also used as EAC Club DJ station!!
Its a great bus and we love it to the max!
Also added a rear bumper to it and a new MONDO exhaust to improve performance :twisted:
Next thing is:
Slamming it to the floor, Got the lowering adjusters already....
Twin Carb conversion, Got them too
Well, it has began...
Went about lowering this week and was sucsessfull
Now got the bus sitting about 6 inches lower than it was at standard hight and now rides at about 3 inches off the road :twisted:
Last few piccys of the new ride height!!! :twisted: :twisted:
standard height!
New ridin' height :evil:
Since this has all ben done, i even got a little mension in Volksworld in Feb 2007 issue on page 66


